This Tutorial Series is divided into 3 Parts.
- Introduction and Project Setup
- MVVM concept and coding
- Simple Unit Testing
When I’m starting to learn programming I don’t often care for clean architecture in my code as long as it works but as you add more features and functionality in your app you realize that it is harder to maintain your code as it goes bigger and more complex. Having clean architecture can help you effectively to trace errors or bugs on your code as we try to limit the dependency for each class and having its own purpose.
There are 3 commonly known design pattern which are MVC(Model View Controller), MVP(Model View Presenter), and MVVM(Model View ViewModel) but today I won’t discuss their differences and will just focus on how MVVM works which Google Developers prefer to use on android development using Kotlin or Java.
About the Project
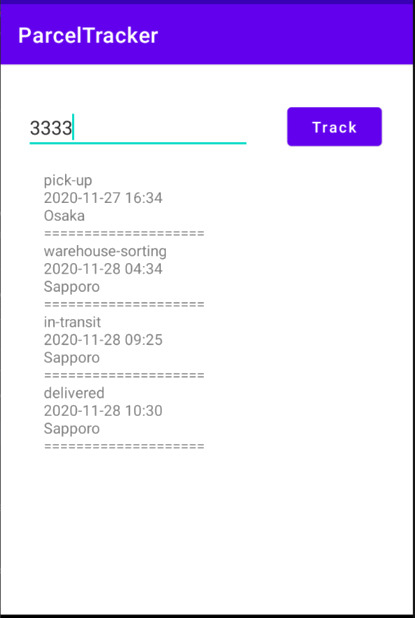
In this tutorial i’ll try as much as possible to make it simple but clear so reader won’t get information overload and can adapt it easily on their future projects. We will use Kotlin as our programming language for making this android project. Our project is base on a parcel tracking system. Let say you order something from an online website such Ebay or Amazon, when we purchase an order online, this websites will send a confirmation message of our order details including a “tracking number” that depends on our preferred shipping method and courier services like EMS, UPS, FEDEX, etc. we then can use this tracking number on their online platform to monitor our parcel delivery status. Base on that our simple project will look like this:
Goal:
- Make a simple project base on how Parcel Tracker works.
- Learn how to use Prepopulated SQLite Database.
- Understand the basic use and concept of MVVM.
- Understand and make a Simple Unit Testing.
- Understand the difference between androidTest and test.
Setting-up our Project
First I would like to inform you the version for android studio, gradle and target SDK while I’m developing this project.
Android Studio: 4.1.1
Gradle Version: 6.5
Target SDK Version: 30 (Check in your app gradle)
Now let’s start creating a new android project. Select an empty activity and configure our project

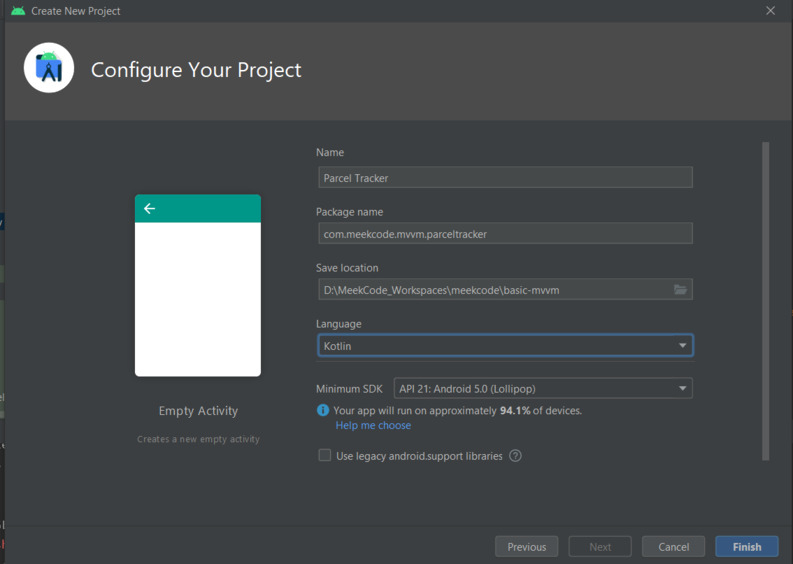
App Name: Parcel Tracker
Package Name: com.meekcode.mvvm.parceltracker
Language: Kotlin
Minimum SDK: API 21
App Gradle
In your app gradle file add these dependencies to use room in our project
def room_version = "2.2.5"
implementation "androidx.room:room-runtime:$room_version"
kapt "androidx.room:room-compiler:$room_version"
And inside plugins block add ‘kotlin-kapt’
plugins {
    id 'com.android.application'
    id 'kotlin-android'
    id 'kotlin-kapt'
}
Layout
Our layout for activity_main.xml
<?xml version="1.0" encoding="utf-8"?>
<androidx.constraintlayout.widget.ConstraintLayout xmlns:android="http://schemas.android.com/apk/res/android"
    xmlns:app="http://schemas.android.com/apk/res-auto"
    xmlns:tools="http://schemas.android.com/tools"
    android:layout_width="match_parent"
    android:layout_height="match_parent"
    tools:context=".MainActivity">

    <Button
        android:id="@+id/btnTrack"
        android:layout_width="wrap_content"
        android:layout_height="wrap_content"
        android:layout_marginEnd="40dp"
        android:layout_marginStart="34dp"
        android:layout_marginTop="34dp"
        android:text="@string/track"
        android:textAllCaps="false"
        app:layout_constraintEnd_toEndOf="parent"
        app:layout_constraintHorizontal_bias="0.5"
        app:layout_constraintStart_toEndOf="@+id/etxtTrackingNum"
        app:layout_constraintTop_toTopOf="parent" />

    <EditText
        android:id="@+id/etxtTrackingNum"
        android:layout_width="wrap_content"
        android:layout_height="wrap_content"
        android:layout_marginStart="34dp"
        android:layout_marginTop="36dp"
        android:ems="10"
        android:hint="@string/enter_your_tracking_no"
        android:importantForAutofill="no"
        android:inputType="number"
        app:layout_constraintEnd_toStartOf="@+id/btnTrack"
        app:layout_constraintHorizontal_bias="0.5"
        app:layout_constraintStart_toStartOf="parent"
        app:layout_constraintTop_toTopOf="parent"
        tools:text="@string/enter_your_tracking_no" />

    <TextView
        android:id="@+id/txtResult"
        android:layout_width="wrap_content"
        android:layout_height="wrap_content"
        android:layout_marginStart="40dp"
        android:layout_marginTop="10dp"
        android:layout_marginEnd="313dp"
        app:layout_constraintBottom_toBottomOf="parent"
        app:layout_constraintEnd_toEndOf="parent"
        app:layout_constraintHorizontal_bias="0.0"
        app:layout_constraintStart_toStartOf="parent"
        app:layout_constraintTop_toBottomOf="@+id/etxtTrackingNum"
        app:layout_constraintVertical_bias="0.042"
        tools:text="Search Result" />

</androidx.constraintlayout.widget.ConstraintLayout>
String resources at strings.xml
<resources>
<string name="app_name">ParcelTracker</string>
<string name="track">Track</string>
<string name="enter_your_tracking_no">Enter your tracking no.</string>
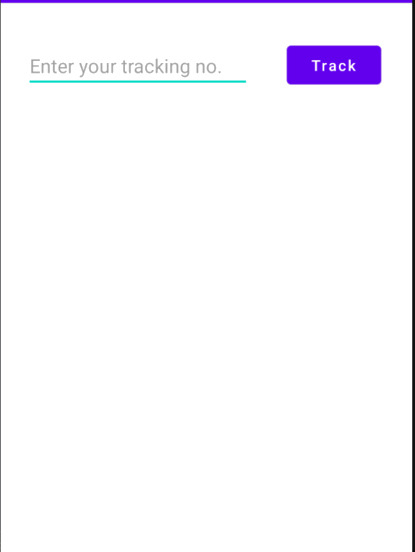
</resources>Now if we run our app, the simple layout should look like this:
Folder Structure
You can make your own folder structure but for readability we will make our folders base on MVVM architecture. To add a new folder, just right click in parceltracker package folder>New>Package and name the folders as shown in the image.
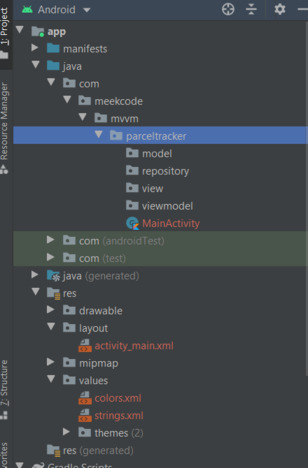
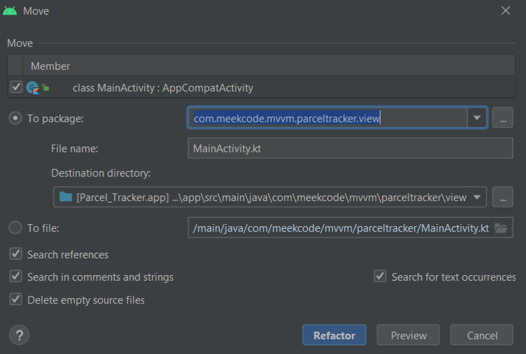
Let’s also move the MainActivity class to inside view folder and click Refactor.
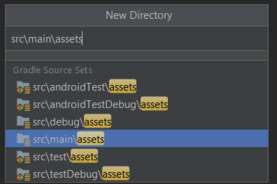
Create assets folder at src/main and another directory folder inside of it called database
Prepopulated Database
I made this database using SQLite Browser and named it “InitialParcelTracker.db”. I prefix it with “Initial” because this database will just be copied in our app when our Room database initialize. Further explanation later on as we make our database class.
Our Prepopulated table and fields will look like this.
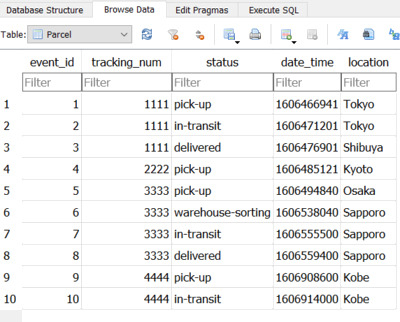
You can try to make the database yourself or just download it here. Download Database
and be sure to copy or move our pre-populated database to assets/database folder.
Conclusion
This ends the Part 1 of the tutorial, on the next tutorial we will start the coding for our MVVM architecture and discuss its basic concept. Part 2 Tutorial