This Tutorial Series is divided into 3 Parts.
- Introduction and Project Setup
- MVVM concept and coding
- Simple Unit Testing
This is the last part of the tutorial series for “Basic MVVM in Android Kotlin using Prepopulated Database and Room w/ Unit Testing”. Today we will do a Simple Unit Testing base on our Parcel Tracker App but first what is Unit Testing and why it is important? Unit testing is a type of software testing where individual units(could be a method, class or components) of an application or software are tested to make sure the logic is working properly and correct. It is important because it helps you to find and fix errors or bugs that usually happen when you update or change something in your code and it could also help to improve the quality of your code.
androidTest vs. test
If you start or create an android project, you probably notice these two extra folders in your directory which is androidTest and test. These folders are used for Android Testing. The main difference between these two is the test directory is use for Local Unit Testing that can just run using JVM(Java Virtual Machine) without the need to reference anything from the UI or Android Lifecycle while androidTest is used for Instrumented Tests which usually for testing your UI or functions that needed to run on a device emulator. Since test don’t need to run and build on a device emulator, test units are much faster to execute than androidTest.
test – Local Unit Test
Let’s start by adding the dependency we need on our app gradle file.
//Truth Assertion
testImplementation "com.google.truth:truth:1.1"

//Arch Core - InstantTaskExecutorRule
testImplementation 'android.arch.core:core-testing:1.1.1'
//Mockito framework
testImplementation  'org.mockito:mockito-core:2.19.0'
Truth - is a library for performing assertions in tests that much more clear and readable than the JUnit assertion methods.
Arch Core - helper for other arch dependencies, including JUnit test rules that can be used with LiveData.
Mockito – a mocking framework used for unit testing.
Testing our View Model
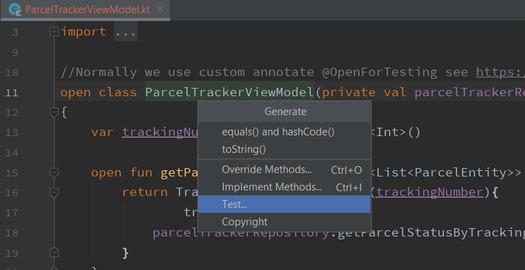
Open the ParcelTrackerViewModel class and just right click to its name>click generate>test
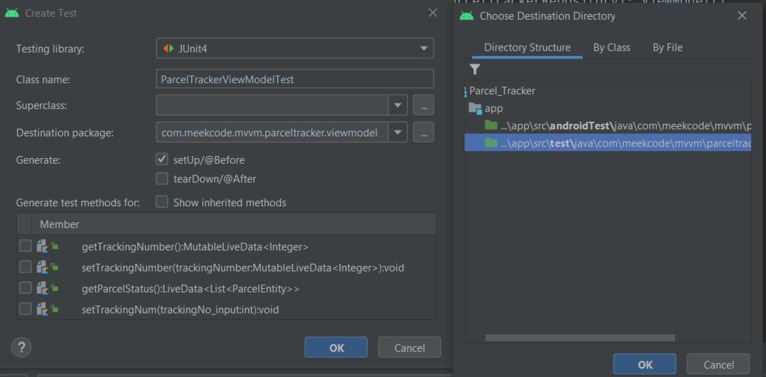
Since our Parcel Tracker App is very simple we just have few methods to test. Let’s try our first simple test which is testing “if tracking number is not a negative value”.
Back to our code, we should annotate our test class with @RunWith(MockitoJUnitRunner::class)
@RunWith(MockitoJUnitRunner::class)
class ParcelTrackerViewModelTest {....}
Then let us define ParelTrackerViewModel in our class.
private lateinit var viewModel: ParcelTrackerViewModelSince we won’t be running it from a device emulator, we can’t also use the actual database from it so we need to create a Mock for repository and observer
@Mock
lateinit var repo: ParcelTrackerRepository

@Mock
lateinit var observer: Observer<List<ParcelEntity>>
Initialize it on our setup method with @Before annotation.
@Before
fun setUp() {
    viewModel = ParcelTrackerViewModel(repo)
    viewModel.getParcelStatus().observeForever(observer)
}
We also need to define a rule so that our LiveData can run during our test.
@Rule
@JvmField
val rule = InstantTaskExecutorRule()
Finally we can create our test function: “if tracking number is not a negative value”.
@Test
fun `test if track num is not a negative value`() {
    viewModel.setTrackingNum(1)
    Truth.assertThat(viewModel.trackingNumber.value).isGreaterThan(0)
}
Here we try to put “1” in the “viewmodel.setTrackingNum()”which is a positive value. Then we use Truth assertion method with “isGreaterThan()” that checks if the value is greater than the other, it reads like “1 is greater than 0”.
Run our app and it should pass our test.

You can also try to put a negative value and see if it will fail the test.
For our next test we will test or rather “verify if we got result from a correct tracking number”
@Test
fun `verify if we got result from a correct track num`() {
    val expectedNum = 4321
    val trackNum = 4321

    val fakeResult = listOf(
        ParcelEntity(3, 3333, "pick-up", 3, "Philippines")
    )
    val fakeResponse = MutableLiveData<List<ParcelEntity>>()
    fakeResponse.value = fakeResult

    Mockito.`when`(repo.getParcelStatusByTrackingNum(expectedNum)).then {
        fakeResponse
    }

    viewModel.setTrackingNum(trackNum)
    Mockito.verify(observer).onChanged(fakeResult)
}
What happens here is that we first create a fake response by mocking the “getParcelStatusByTrackingNum()” method of the repo with an expected value of “4321” as tracking number. Remember that when we input a tracking number to the view model, this value is observed and call the method from our repository class to be used. So for testing our tracking number value should be also “4321” in order to pass the test, let’s try to run and check.

ParcelTrackerViewModelTest.kt
@RunWith(MockitoJUnitRunner::class)
class ParcelTrackerViewModelTest {

    //We need this to test our LiveData observers
    @Rule
    @JvmField
    val rule = InstantTaskExecutorRule()

    private lateinit var viewModel: ParcelTrackerViewModel

    @Mock
    lateinit var repo: ParcelTrackerRepository

    @Mock
    lateinit var observer: Observer<List<ParcelEntity>>

    @Before
    fun setUp() {
        viewModel = ParcelTrackerViewModel(repo)
        viewModel.getParcelStatus().observeForever(observer)
    }

    @Test
    fun `test if track num is not a negative value`() {
        viewModel.setTrackingNum(1)
        Truth.assertThat(viewModel.trackingNumber.value).isGreaterThan(0)
    }

    @Test
    fun `verify if we got result from a correct track num`() {
        val expectedNum = 4321
        val trackNum = 4321

        val fakeResult = listOf(
            ParcelEntity(3, 3333, "pick-up", 3, "Philippines")
        )
        val fakeResponse = MutableLiveData<List<ParcelEntity>>()
        fakeResponse.value = fakeResult

        Mockito.`when`(repo.getParcelStatusByTrackingNum(expectedNum)).then {
            fakeResponse
        }

        viewModel.setTrackingNum(trackNum)
        Mockito.verify(observer).onChanged(fakeResult)
    }
}
androidTest – Instrumented Test
Normally espresso is already part of the dependency in our app gradle when we create an android project, but let’s check and also add the Truth library for anroidTestImplementation in the dependency.
//Espresso
androidTestImplementation 'androidx.test.espresso:espresso-core:3.3.0'
// Truth Assertion
testImplementation "com.google.truth:truth:1.1"
androidTestImplementation "com.google.truth:truth:1.1"
Espresso is a framework used for UI testing or automated testing.
Testing our MainActivity
Same as what we did in our Local Unit Test, Open the MainActivity class and right click to its name>click generate>test but choose the directory with androidTest
Before we start coding let’s plan first our sample test cases for the MainActivity, we will test if:
- textResult is not empty if the input was correct
- textResult is empty if input is wrong
- view model tracking number accepts integer input
Let’s add an annotation on our MainActivityTest class for testing.
@RunWith(AndroidJUnit4::class)
@LargeTest
class MainActivityTest {....}
We will also make an activity rule and initialize the view model in the setup function
@get:Rule
var activityRule: ActivityScenarioRule<MainActivity>
        = ActivityScenarioRule(MainActivity::class.java)

private lateinit var viewModel: ParcelTrackerViewModel

@Before
fun setUp() {
    activityRule.scenario.onActivity { activity ->
        viewModel = activity.viewModel
    }
}
Now we can start making our test functions base on our test cases.
test case 1: textResult is not empty if the input was correct
@Test
fun textResultIsNotEmptyIfCorrectInput()
{
    onView(withId(R.id.etxtTrackingNum))
        .perform(typeText("3333"), closeSoftKeyboard())
    onView(withId(R.id.btnTrack)).perform(click())

    onView(withId(R.id.txtResult))
        .check(ViewAssertions.matches(not(withText(""))))
}
test case 2: textResult is empty if input is wrong
@Test
fun textResultIsEmptyIfWrongInput()
{
    onView(withId(R.id.etxtTrackingNum)).perform(clearText())
    onView(withId(R.id.btnTrack)).perform(click())

    onView(withId(R.id.txtResult))
        .check(ViewAssertions.matches((withText(""))))
}
test case 3: view model tracking number accepts integer input
@Test
fun viewModelTackNumAcceptsIntegerInput()
{
val input = "1234"
onView(withId(R.id.etxtTrackingNum))
.perform(typeText(input), closeSoftKeyboard())
onView(withId(R.id.btnTrack)).perform(click())
Truth.assertThat(viewModel.trackingNumber.value).isNotNull()
Truth.assertThat(viewModel.trackingNumber.value).isEqualTo(input.toInt())
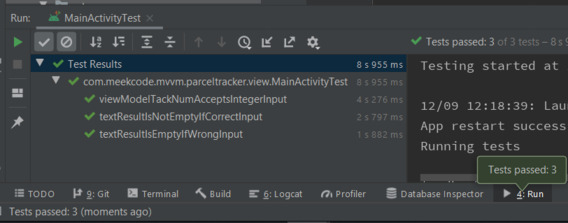
}In these examples we show how Espresso automate actions from our MainActivity. Run our tests and you could see it running on your device emulator depending how fast to execute each action will be.
MainActivityTest.kt
@RunWith(AndroidJUnit4::class)
@LargeTest
class MainActivityTest {

    @get:Rule
    var activityRule: ActivityScenarioRule<MainActivity>
            = ActivityScenarioRule(MainActivity::class.java)

    private lateinit var viewModel: ParcelTrackerViewModel

    @Before
    fun setUp() {
        activityRule.scenario.onActivity { activity ->
            viewModel = activity.viewModel
        }
    }

    @Test
    fun textResultIsNotEmptyIfCorrectInput()
    {
        onView(withId(R.id.etxtTrackingNum))
            .perform(typeText("3333"), closeSoftKeyboard())
        onView(withId(R.id.btnTrack)).perform(click())

        onView(withId(R.id.txtResult))
            .check(ViewAssertions.matches(not(withText(""))))
    }

    @Test
    fun textResultIsEmptyIfWrongInput()
    {
        onView(withId(R.id.etxtTrackingNum)).perform(clearText())
        onView(withId(R.id.btnTrack)).perform(click())

        onView(withId(R.id.txtResult))
            .check(ViewAssertions.matches((withText(""))))
    }

    @Test
    fun viewModelTackNumAcceptsIntegerInput()
    {
        val input = "1234"
        onView(withId(R.id.etxtTrackingNum))
            .perform(typeText(input), closeSoftKeyboard())
        onView(withId(R.id.btnTrack)).perform(click())

        Truth.assertThat(viewModel.trackingNumber.value).isNotNull()
        Truth.assertThat(viewModel.trackingNumber.value).isEqualTo(input.toInt())
    }
}
Conclusion
In this tutorial we have learn the difference between test and androidTest folders in Android Development. We did some testing with the help of testing framework such as Mockito and Espresso and learn some basic use of it. This is the github link for this tutorial series: Parcel Tracker App - Github
I have been thinking also to make another version for this tutorial using Dagger which is a Dependency Injection framework, let me know in the comment section if you have suggestions about it.