This Tutorial Series is divided into 3 Parts.
- Introduction and Project Setup
- MVVM concept and coding
- Simple Unit Testing
This is the part 2 of the tutorial, you can check the part 1 here: Link to Part 1 if you haven’t read it yet.
MVVM stands for Model-View-ViewModel. Below is a diagram that shows the flow of the MVVM architecture using a Room Database. We will also follow this diagram and discuss each component as we create our classes for our Parcel Tracker App.

Model
Components that is responsible for handling the data for an app. In Android using Room Persistence Library with its 3 major components could already compose the model structure for the app which is Entity, Dao, and Database.
Entity
It represents the table and fields of the database. Let’s check our database table using SQLite Browser before we make our Entity class.
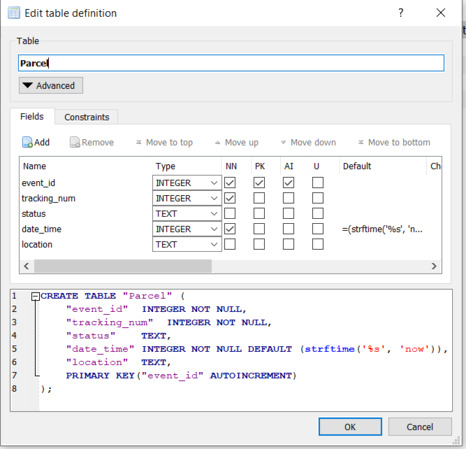
Now base on the table and fields here let’s create now our Entity class inside model folder and we will call it ParcelEntity.kt since our table name is also called Parcel.
ParcelEntity.kt
@Entity(tableName = "Parcel")
data class ParcelEntity(
    @PrimaryKey(autoGenerate = true) @ColumnInfo(name = "event_id") @NotNull val event_id: Int,
    @ColumnInfo(name = "tracking_num") @NotNull val tracking_num: Int,
    @ColumnInfo(name = "status") val status: String?,
    @ColumnInfo(name = "date_time") val date_time: Int,
    @ColumnInfo(name = "location") val location: String?,
)
DAO
DAO stands for Data Access Object that contains methods used for accessing the database which also known as CRUD(Create Read Update Delete). Since the aim for this app is to make it simple but still having to learn the concept of MVVM, we will just gonna use Read for now by using Query. Let’s start by making our DAO class and named it ParcelDao.kt inside model folder.
ParcelDao.kt
@Dao
interface ParcelDao {
    @Query("SELECT * FROM Parcel WHERE tracking_num = :tracking_num ORDER BY date_time")
    fun getParcelStatusByTrackingNum(tracking_num: Int): LiveData<List<ParcelEntity>> //Use LiveData to run the query asynchronously and get results via observer pattern
}
Like our Entity class we also use some annotation here like @Dao and @Query so our Room Database will be able to generate an implementation of this class at compile-time when it is referenced by it. Dao class should either be an interface or an abstract. Here we use a simple sql statement on our method to query the results if a tracking number match from the table and will also sort it by the date_time field that is ascending order by default.
Database
Database is an organized collection of data, generally stored and can be manage and access in different ways. Let’s create our database class and named it ParcelTrackerDatabase.kt still inside the model folder.
ParcelTrackerDatabase.kt
@Database(entities = [ParcelEntity::class], version = 1, exportSchema = false)
abstract class ParcelTrackerDatabase  : RoomDatabase() {
    abstract fun parcelDao(): ParcelDao

    companion object{
        // Singleton prevents multiple instances of database opening at the
        // same time as each RoomDatabase instance is fairly expensive,
        // and you rarely need access to multiple instances within a single process

        @Volatile
        private var instance: ParcelTrackerDatabase? = null

        const val DB_NAME = "CopiedParcelTracker.db"
        fun getDatabase(context: Context): ParcelTrackerDatabase
        {
            return instance ?: synchronized(this)
            {
                val dbInstance =  Room.databaseBuilder(context.applicationContext, ParcelTrackerDatabase::class.java , DB_NAME)
                    .createFromAsset("database/InitialParcelTracker.db")
                    //.addMigrations(MIGRATION) // do migration if you want to get the updated prepopulated database
                    .build()
                instance = dbInstance
                dbInstance
            }
        }

    }
}
You should also take note the comment in the code where we must make it a singleton to prevent multiple instances of database opening at same time. We also need to annotate it with @Database to mark the class as a Room Database.
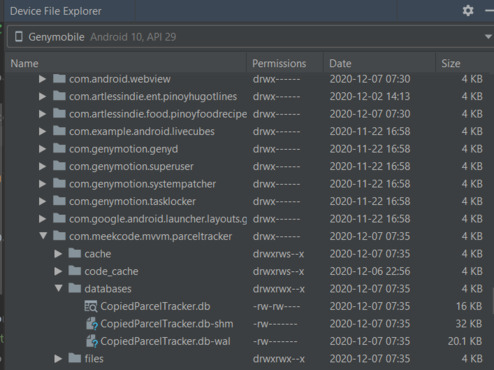
Did you notice that we have two different database names? InitialParcelTracker.db and CopiedParcelTracker.db What happens here is that when we use createFromAsset from Room DatabaseBuilder, it will just copy the one we put on our assets/database folder and generate a new database inside our app that we named it CopiedParcelTracker.db, this copy is what our app will going to use for different database transactions. If we already initialize our database we can use a tool in android studio which is Device File Explorer to see if it’s there, it should be copied to the path data/data/[app package name]/databases/ like shown in the image.
We are done doing our Model Component, with just that we can even have a working app just by initializing our database in the activity and use it but that would ruined our MVVM architecture, let’s continue and make the other components for it.
Repository
It is a class use for managing queries and allows you to use multiple data sources. Repository implements the logic for deciding whether to fetch data from a network or use results cached in the local database. Let’s create our class and name it ParcelTrackerRepository.kt inside repository folder.
ParcelTrackerRepository.kt
//Pass in the DAO instead of the whole database, because you only need access to the DAO
//Normally we use custom annotate @OpenForTesting see https://kotlinlang.org/docs/reference/compiler-plugins.html
open class ParcelTrackerRepository private constructor(private val parcelDao: ParcelDao) {

    companion object{
        @Volatile
        private var instance: ParcelTrackerRepository? = null

        fun getInstance(parcelDao: ParcelDao) : ParcelTrackerRepository
        {
            return instance ?: synchronized(this){
                instance ?: ParcelTrackerRepository(parcelDao).also { instance = it }
            }
        }
    }

    open fun getParcelStatusByTrackingNum(tracking_num: Int): LiveData<List<ParcelEntity>> {
        return parcelDao.getParcelStatusByTrackingNum(tracking_num)
    }

}
Here we also made this to a Singleton as we just only need one instance for repository. We make it an open class so we can use it for our Unit Testing in part 3 but usually we can use a custom annotation for that so it would work only during our development. You may notice also it is kinda redundant on what our DAO class can do but trust me they have each own role, it is just not obvious in our app as it is simple and only have a single method. For bigger apps a repository can have multiple DAO or reference to a web api to handle the logic for the data. If an app gonna use a webservice using retrofit and a local database, the app diagram would look like the diagram below.

ViewModel
The View Model is a class that provides the data for a specific UI component, such as a fragment or activity and survive configuration changes. It acts as a communication center between the repository and the view. It transforms inputs to data so model will be able to store or update it. It should not know if any view subscribes to it and should not have any references from the view. Let’s create our class and named it ParcelTrackerViewModel.kt inside viewmodel folder.
ParcelTrackerViewModel.kt
//Normally we use custom annotate @OpenForTesting see https://kotlinlang.org/docs/reference/compiler-plugins.html
open class ParcelTrackerViewModel(private val parcelTrackerRepository: ParcelTrackerRepository): ViewModel()
{
    var trackingNumber = MutableLiveData<Int>()

    open fun getParcelStatus(): LiveData<List<ParcelEntity>> {
        return Transformations.switchMap(trackingNumber){
                trackNoInput ->
            parcelTrackerRepository.getParcelStatusByTrackingNum(trackNoInput)
        }
    }

    fun setTrackingNum(trackingNo_input: Int)
    {
        trackingNumber.value = trackingNo_input
    }
}
Like in our Repository class we will make it open so we can use it for Unit Testing as the default modifier in kotlin is final. We also need to make a custom View Model Factory since we have a repository parameter in our View Model constructor, we will use this View Model Factory later when we initialize our view model into our view or activity. Let’s name it ParcelTrackerViewModelFactory.kt inside viewmodel folder.
ParcelTrackerViewModelFactory.kt
class ParcelTrackerViewModelFactory(private val context: Context) : ViewModelProvider.Factory {

    override fun <T : ViewModel> create(modelClass: Class<T>): T {
        if (modelClass.isAssignableFrom(ParcelTrackerViewModel::class.java)) {
            val repository = ParcelTrackerRepository.getInstance(ParcelTrackerDatabase.getDatabase(context).parcelDao())
            return ParcelTrackerViewModel(repository) as T
        }
        throw IllegalArgumentException("Unknown ViewModel class")
    }
}
View
The simplest explanation for this is view is the UI(User Interface) or which our naked eye can see in our app. In Android this is commonly from fragments or activity. Let’s now modify our MainActivity.kt and use the ParcelTrackerViewModel to observe the result and bind it into a textview.
MainActivity.kt
class MainActivity : AppCompatActivity() {
lateinit var viewModel: ParcelTrackerViewModel
override fun onCreate(savedInstanceState: Bundle?) {
super.onCreate(savedInstanceState)
setContentView(R.layout.activity_main)
//initialize viewModel
val factory = ParcelTrackerViewModelFactory(this)
viewModel = ViewModelProvider(this,factory).get(ParcelTrackerViewModel::class.java)
//initialize ui reference
val etxtTrackNum = findViewById<EditText>(R.id.etxtTrackingNum)
val txtResult = findViewById<TextView>(R.id.txtResult)
val btnTrack = findViewById<Button>(R.id.btnTrack)
btnTrack.setOnClickListener(View.OnClickListener {
val trackNum = etxtTrackNum.text.toString()
if (trackNum != "") {
viewModel.setTrackingNum(trackNum.toInt())
viewModel.getParcelStatus()
.observe(this, Observer { results ->
val stringBuilder = StringBuilder()
results.forEach {parcelEntity ->
stringBuilder.append(parcelEntity.status)
stringBuilder.appendLine()
//Normally we use a TypeConverter class for such datetime fields
val sdf = SimpleDateFormat("yyyy-MM-dd HH:mm")
sdf.timeZone = TimeZone.getTimeZone("GMT")
val netDate = Date(parcelEntity.date_time.toLong() * 1000)
val date = sdf.format(netDate)
stringBuilder.append(date.toString())
stringBuilder.appendLine()
stringBuilder.append(parcelEntity.location)
stringBuilder.appendLine()
stringBuilder.append("=".repeat(20))
stringBuilder.appendLine()
}
//bind result to ui
txtResult.text = stringBuilder.toString()
})
}
})
}
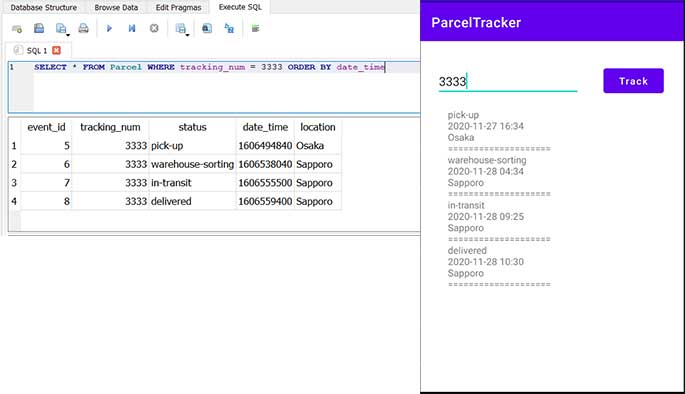
}Let’s run our app and check whether the result is same as the one with our prepopulated database. Let’s try to input a tracking number “3333” as an example and click the track button.
Conclusion
We have finished our simple Parcel Tracker App, we learn how to use a Prepopulated Database using Room and also learn about the different components of MVVM and their role which helps us to separate business logic and UI to write much cleaner architecture. In the final part of tutorial series we will make a simple Unit Testing and get to know why it is important. Part 3 Tutorial