There are tons of apps that is base on face detection made with the help of libraries like OpenCV or MlKit some of these are face swap, face changer, face editor and many more. As a starting point for making a similar app i’ll be teaching you on how to implement face detection using Google MlKit and CameraX. The implementation is not that hard, in fact we will only use 3 kotlin class for this tutorial to have a complete app with face detection.
Project Set-up
Create an android project
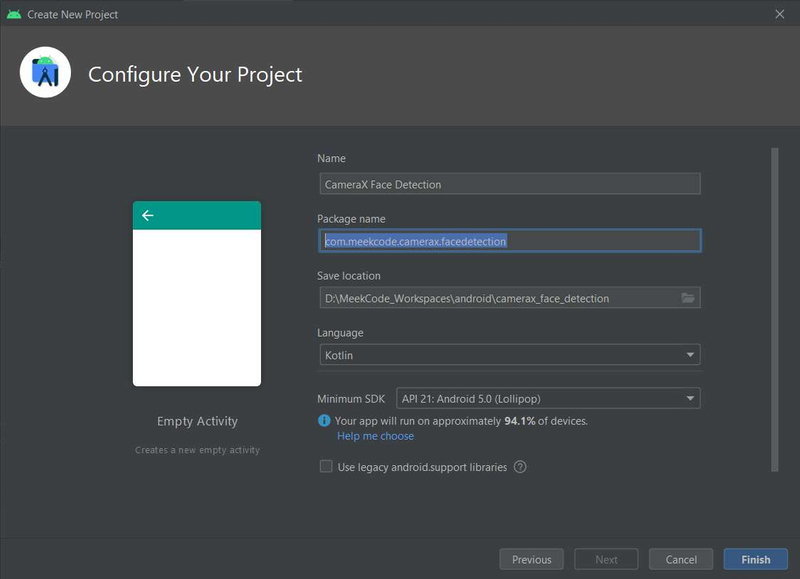
Template: Empty Activity
App Name: CameraX Face Detection
Package Name: com.meekcode.camerax.facedetection
Language: Kotlin
Minimum SDK: API 21
Add dependencies in app gradle file
def camerax_version = "1.0.0-beta07"
// CameraX core library using camera2 implementation
implementation "androidx.camera:camera-camera2:$camerax_version"
// CameraX Lifecycle Library
implementation "androidx.camera:camera-lifecycle:$camerax_version"
// CameraX View class
implementation "androidx.camera:camera-view:1.0.0-alpha14"
// Use this dependency to bundle ml-kit model with your app
implementation 'com.google.mlkit:face-detection:16.0.3'
Note: You have 2 dependency option to choose for ml-kit face detection, one is bundled with your app while the other one is using model within Google Play Service, for more info read this https://developers.google.com/ml-kit/vision/face-detection/android#before-you-begin
Layout
activity_main.xml
<?xml version="1.0" encoding="utf-8"?>
<androidx.constraintlayout.widget.ConstraintLayout xmlns:android="http://schemas.android.com/apk/res/android"
    xmlns:app="http://schemas.android.com/apk/res-auto"
    xmlns:tools="http://schemas.android.com/tools"
    android:layout_width="match_parent"
    android:layout_height="match_parent"
    tools:context=".MainActivity">

    <androidx.camera.view.PreviewView
        android:id="@+id/viewFinder"
        android:layout_width="match_parent"
        android:layout_height="match_parent" />

</androidx.constraintlayout.widget.ConstraintLayout>
Requesting Camera Permission
Add this in your AndroidManifest.xml file just before the application tag
<uses-feature android:name="android.hardware.camera.any" />
<uses-permission android:name="android.permission.CAMERA" />
Open your MainAcitvity.kt and copy this code
class MainActivity : AppCompatActivity() {

    private lateinit var viewFinder: PreviewView
    //private lateinit var overlay: Overlay
    private var cameraExecutor = Executors.newSingleThreadExecutor()

    override fun onCreate(savedInstanceState: Bundle?) {
        super.onCreate(savedInstanceState)

        setContentView(R.layout.activity_main)
        viewFinder = findViewById(R.id.viewFinder)

        if (allPermissionsGranted()) {
            startCamera()
        } else {
            ActivityCompat.requestPermissions(
                this, REQUIRED_PERMISSIONS, REQUEST_CODE_PERMISSIONS
            )
        }
    }

    override fun onRequestPermissionsResult(
        requestCode: Int, permissions: Array<String>, grantResults:
        IntArray
    ) {
        if (requestCode == REQUEST_CODE_PERMISSIONS) {
            if (allPermissionsGranted()) {
                startCamera()
            } else {
                Toast.makeText(this,
                    "Permissions not granted by the user.",
                    Toast.LENGTH_SHORT).show()
                finish()
            }
        }
    }

    private fun allPermissionsGranted() = REQUIRED_PERMISSIONS.all {
        ContextCompat.checkSelfPermission(baseContext, it) == PackageManager.PERMISSION_GRANTED
    }

    private fun startCamera()
    {
        //...
    }

    companion object {
        private const val TAG = "MainActivity"
        private const val REQUEST_CODE_PERMISSIONS = 10
        private val REQUIRED_PERMISSIONS = arrayOf(
            Manifest.permission.CAMERA,
        )
    }

}
Starting Camera w/ Preview UseCase
Modify the startCamera function
@SuppressLint("UnsafeExperimentalUsageError")
private fun startCamera()
{
    val cameraProviderFuture = ProcessCameraProvider.getInstance(this)

    cameraProviderFuture.addListener(Runnable {
        // Used to bind the lifecycle of cameras to the lifecycle owner
        val cameraProvider: ProcessCameraProvider = cameraProviderFuture.get()
        // Select back camera as a default
        val cameraSelector = CameraSelector.DEFAULT_BACK_CAMERA
        // Preview UseCase
        val previewUseCase = Preview.Builder()
                .build()
                .also {
                    it.setSurfaceProvider(viewFinder.createSurfaceProvider())
                }

        try {
            // Unbind use cases before rebinding
            cameraProvider.unbindAll()

            // Bind use cases to camera
            cameraProvider.bindToLifecycle(this, cameraSelector, previewUseCase)

        } catch(exc: Exception) {
            Log.e(TAG, "Use case binding failed", exc)
        }

    }, ContextCompat.getMainExecutor(this))
}
You can change or choose the camera view by changing the cameraSelector but for now we will use the back camera for this tutorial.
Dealing with camera orientation can be tricky for starters so we will lock our activity to landscape mode in AndroidManifest.xml
<activity android:name=".MainActivity" android:screenOrientation="landscape">You can test and try your project in device and see if the camera is working
FaceDectection w/ ImageAnalysis UseCase
Create Overlay.kt class to show some visual when using face detection
class Overlay @JvmOverloads constructor(
    context: Context,
    attrs: AttributeSet? = null,
    defStyleAttr: Int = 0
) : View(context, attrs, defStyleAttr) {

    private var previewWidth: Int = 0
    private var widthScaleFactor = 1.0f
    private var previewHeight: Int = 0
    private var heightScaleFactor = 1.0f

    private var faces = emptyArray<Face>()
    private var orientation = Configuration.ORIENTATION_LANDSCAPE

    private val paint = Paint(Paint.ANTI_ALIAS_FLAG).apply {
        color = Color.YELLOW
        style = Paint.Style.STROKE
        strokeWidth = 5.0f
    }

    private val dotPaint = Paint(Paint.ANTI_ALIAS_FLAG).apply {
        color = Color.YELLOW
        style = Paint.Style.FILL
        strokeWidth = 1.0f
    }

    override fun onDraw(canvas: Canvas) {
        super.onDraw(canvas)
        drawOverlay(canvas);
    }

    fun setOrientation(orientation: Int)
    {
        this.orientation = orientation
    }

    fun setPreviewSize(size: Size) {
        // Need to swap width and height when in portrait, since camera's natural orientation is landscape.
        if(orientation == Configuration.ORIENTATION_LANDSCAPE) {
            previewWidth = size.width
            previewHeight = size.height
        }
        else
        {
            previewWidth = size.height
            previewHeight = size.width
        }
    }

    fun setFaces(faceList: List<Face>)
    {
        faces = faceList.toTypedArray()
        postInvalidate()
    }

    private fun drawOverlay(canvas: Canvas) {
        widthScaleFactor = width.toFloat() / previewWidth
        heightScaleFactor = height.toFloat() / previewHeight

        for(face in faces)
        {
            drawFaceBorder(face, canvas)
            drawFaceContour(face,canvas)
            //drawFaceLandmark(face,canvas)
        }
    }

    private fun drawFaceBorder(face: Face, canvas: Canvas)
    {
        val bounds = face.boundingBox
        val left = translateX(bounds.left.toFloat())
        val top = translateY(bounds.top.toFloat())
        val right = translateX(bounds.right.toFloat())
        val bottom = translateY(bounds.bottom.toFloat())

        canvas.drawRect(left, top, right, bottom, paint)
    }

    //Note: Contours are detected for only the most prominent face in an image.
    private fun drawFaceContour(face: Face, canvas: Canvas)
    {
        val contour = face.allContours
        for (faceContour in contour) {
            for (point in faceContour.points) {
                val px = translateX(point.x)
                val py = translateY(point.y)
                canvas.drawCircle(px, py, 10.0f, dotPaint)
            }
        }
    }

    private fun drawFaceLandmark(face: Face, canvas: Canvas)
    {
        val leftEye = face.getLandmark(FaceLandmark.LEFT_EYE)
        val rightEye = face.getLandmark(FaceLandmark.RIGHT_EYE)
        val leftCheek = face.getLandmark(FaceLandmark.LEFT_CHEEK)
        val rightCheek = face.getLandmark(FaceLandmark.RIGHT_CHEEK)

        drawFaceLandmark(leftEye,canvas)
        drawFaceLandmark(rightEye,canvas)
        drawFaceLandmark(leftCheek,canvas)
        drawFaceLandmark(rightCheek,canvas)
    }

    private fun drawFaceLandmark(faceLandmark: FaceLandmark?, canvas: Canvas)
    {
        if(faceLandmark == null)
            return
        canvas.drawCircle(translateX(faceLandmark.position.x),translateY(faceLandmark.position.y), 10.0f, dotPaint)
    }

    private fun translateX(x: Float): Float = x * widthScaleFactor
    private fun translateY(y: Float): Float = y * heightScaleFactor

}
Functions to output or overlay a visual in the face
- drawFaceBorder(face: Face, canvas: Canvas) – draw a square shape around the face bounding box.
- drawFaceContour(face: Face, canvas: Canvas) – draw a dotted contour on the most prominent detected face.
- drawFaceLandmark(face: Face, canvas: Canvas) – draw dots or circle on the given face landmark.
Create our FaceAnalyzer.kt class
class FaceAnalyzer(lifecycle: Lifecycle, private val overlay: Overlay) : ImageAnalysis.Analyzer {

    private val options = FaceDetectorOptions.Builder()
        .setPerformanceMode(FaceDetectorOptions.PERFORMANCE_MODE_ACCURATE)
        .setLandmarkMode(FaceDetectorOptions.LANDMARK_MODE_ALL)
        .setContourMode(FaceDetectorOptions.CONTOUR_MODE_ALL)
        .setClassificationMode(FaceDetectorOptions.CLASSIFICATION_MODE_ALL)
        .setMinFaceSize(0.15f)
        //.enableTracking() //disable when contour is enable https://developers.google.com/ml-kit/vision/face-detection/android
        .build()

    private val detector = FaceDetection.getClient(options)

    init {
        //add the detector in lifecycle observer to properly close it when it's no longer needed.
        lifecycle.addObserver(detector)
    }

    override fun analyze(imageProxy: ImageProxy) {
        overlay.setPreviewSize(Size(imageProxy.width,imageProxy.height))
        detectFaces(imageProxy)
    }

    private val successListener = OnSuccessListener<List<Face>> { faces ->
        Log.d(TAG, "Number of face detected: " + faces.size)
        overlay.setFaces(faces)
    }
    private val failureListener = OnFailureListener { e ->
        Log.e(TAG, "Face analysis failure.", e)
    }

    @SuppressLint("UnsafeExperimentalUsageError")
    private fun detectFaces(imageProxy: ImageProxy) {
        val image = InputImage.fromMediaImage(imageProxy.image as Image, imageProxy.imageInfo.rotationDegrees)
        detector.process(image)
            .addOnSuccessListener(successListener)
            .addOnFailureListener(failureListener)
            .addOnCompleteListener{
                imageProxy.close()
            }
    }

    companion object {
        private const val TAG = "FaceAnalyzer"
    }
}
Initialize Overlay class in MainAcitvity.kt
private lateinit var viewFinder: PreviewView
private lateinit var overlay: Overlay
private var cameraExecutor = Executors.newSingleThreadExecutor()

override fun onCreate(savedInstanceState: Bundle?) {
    super.onCreate(savedInstanceState)

    setContentView(R.layout.activity_main)
    viewFinder = findViewById(R.id.viewFinder)
    overlay = Overlay(this)
    val layoutOverlay = ViewGroup.LayoutParams(
        ViewGroup.LayoutParams.MATCH_PARENT,
        ViewGroup.LayoutParams.MATCH_PARENT
   )
    this.addContentView(overlay,layoutOverlay)

    if (allPermissionsGranted()) {
        startCamera()
    } else {
        ActivityCompat.requestPermissions(
            this, REQUIRED_PERMISSIONS, REQUEST_CODE_PERMISSIONS
        )
    }
}
Update our startCamera function to add analysisUseCase
@SuppressLint("UnsafeExperimentalUsageError")
private fun startCamera()
{
val cameraProviderFuture = ProcessCameraProvider.getInstance(this)
cameraProviderFuture.addListener(Runnable {
// Used to bind the lifecycle of cameras to the lifecycle owner
val cameraProvider: ProcessCameraProvider = cameraProviderFuture.get()
// Select back camera as a default
val cameraSelector = CameraSelector.DEFAULT_BACK_CAMERA
// Preview UseCase
val previewUseCase = Preview.Builder()
.build()
.also {
it.setSurfaceProvider(viewFinder.createSurfaceProvider())
}
// ImageAnalysis UseCase
val analysisUseCase = ImageAnalysis.Builder()
.build()
.also {
it.setAnalyzer(cameraExecutor,FaceAnalyzer(lifecycle,overlay))
}
try {
// Unbind use cases before rebinding
cameraProvider.unbindAll()
// Bind use cases to camera
cameraProvider.bindToLifecycle(this,cameraSelector,previewUseCase)
cameraProvider.bindToLifecycle(this,cameraSelector,previewUseCase,analysisUseCase)
} catch(exc: Exception) {
Log.e(TAG, "Use case binding failed", exc)
}
}, ContextCompat.getMainExecutor(this))
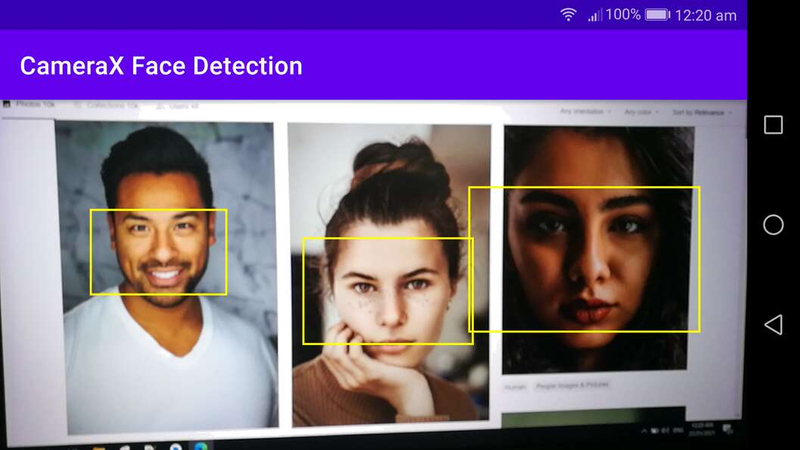
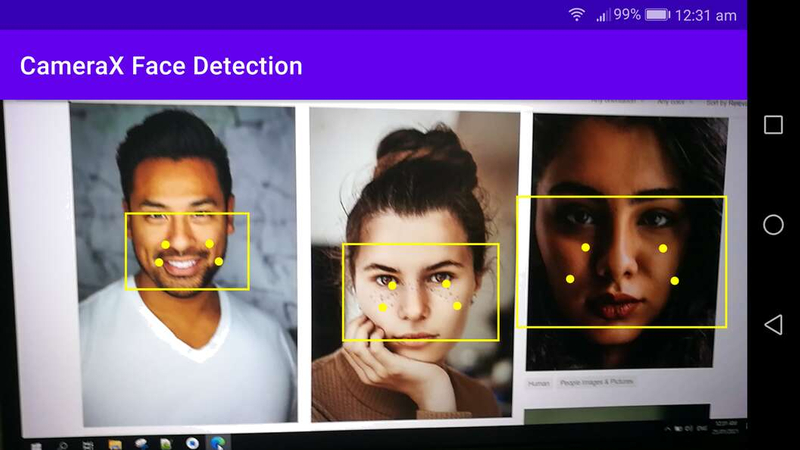
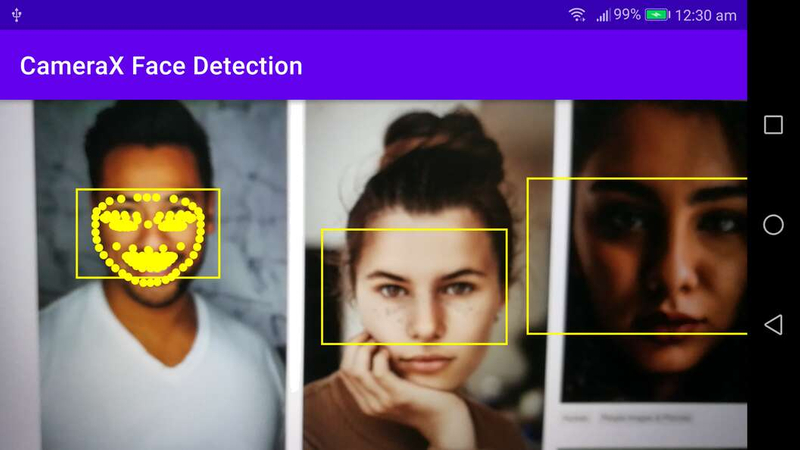
}Run our project in device and test the camera to detect some faces
Faces w/ border
Faces w/ landmark
Face w/ contour
Note: Contours are detected for only the most prominent face in an image.
Github Link: CameraX Live Face Detection
Conclusion
Now that we’re done with the tutorial you can still improve the project by adjusting the camera preview if the device rotates or adding image capture use case to take a photo.