So you want to have a login system using facebook, twitter or other login services in your Gatsby Project but not sure how? Fret not! With PassportJS & Netlify Lambda you can achieve this. I’ll be using passport facebook in this tutorial to make an example on how to implement a simple passport login strategy that we’re gonna try in both localhost and live url using Netlify.
Prerequisite:
- Netlify Account
- Facebook Developer Account
- Gatsby Project
PassportJS Lambda Function
Install necessary packages for our lambda
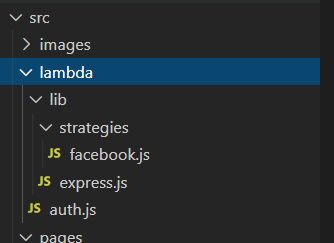
npm install serverless-http passport passport-facebook client-sessions cookie-parser netlify-lambdaOur lambda folder structure should look like this
import serverless from "serverless-http";
import app from "./lib/express";

process.on("uncaughtException", err => {
  console.error(`uncaughtException ${err.toString()}`);
});

process.on("unhandledRejection", reason => {
  console.error(`unhandledRejection ${reason}`);
});

exports.handler = serverless(app);
Create express.js in src/lambda/lib
import express from "express";
import sessions from "client-sessions";
import passport from "passport";
import cookieParser from "cookie-parser";
import facebook from "./strategies/facebook";

const app = express();

app.use(cookieParser());
app.use(
  sessions({
    cookieName: "session",
    secret: "YOUR SESSION SECRET", //TODO: change to your session secret
    cookie: {
      ephemeral: false,
      secure: false
    }
  })
);
app.use(passport.initialize());
app.use(passport.session());

passport.serializeUser((user, cb) => cb(user ? null : "null user", user));
passport.deserializeUser((user, cb) => cb(user ? null : "null user", user));

app.use("/.netlify/functions/auth", facebook);

export default app;
Create facebook.js in src/lambda/lib/strategies
import { Router } from "express"
import passport from "passport"
import { Strategy } from "passport-facebook"

const router = Router()

router.use((req, _res, next) => {
  if (!passport._strategy(Strategy.name)) {
    passport.use(
      new Strategy(
        {
          clientID: "YOUR_FACEBOOK_APP_ID", //TODO: Change to your app ID
          clientSecret: "YOUR_FACEBOOK_APP_SECRET", //TODO: Change to your app secret
          callbackURL: `http://localhost:9000/.netlify/functions/auth/facebook/callback`
        },
        async function (_accessToken, _refreshToken, profile, done) {
          console.info("load user profile", profile);
          const user = {
            id: profile.id,
            displayName: profile.displayName,
          }

          req.user = user
          return done(null, user)
        }
      )
    )
  }
  next()
})

router.get(
  "/facebook",
  passport.authenticate("facebook")
)

router.get(
  "/facebook/callback",
  passport.authenticate("facebook", { failureRedirect: "/" }),
  function callback(req, res) {
    return req.login(req.user, async function callbackLogin(loginErr) {
      if (loginErr) {
        throw loginErr
      }
      return res.redirect("http://localhost:8000/welcome/?name=" + req.user.displayName)
    })
  }
)

export default router
Insert your facebook app id and secret that can be found from your facebook developer account under Settings>Basic

Testing in Localhost
Install http-proxy-middleware package
npm install --save-dev http-proxy-middlewareUse proxy in gatsby-config.js
const { createProxyMiddleware } = require("http-proxy-middleware")

module.exports = {
  siteMetadata: {
    title: "Gatsby-PassportJS",
  },
  developMiddleware: app => {
    app.use(
      "/.netlify/functions/",
      createProxyMiddleware({
        target: "http://localhost:9000",
        pathRewrite: {
          "/.netlify/functions/": "",
        },
      })
    )
  },
  plugins: [],
};
Add Netlify Lambda scripts command in our package.json
  "scripts": {
    "develop": "gatsby develop",
    "start": "gatsby develop",
    "build": "gatsby build",
    "serve": "gatsby serve",
    "clean": "gatsby clean",
    "install:lambda": "netlify-lambda install src/lambda",
    "start:lambda": "netlify-lambda serve src/lambda",
    "build:lambda": "netlify-lambda build src/lambda"
  },
Then we can use these commands in terminal or cmd inside our project.
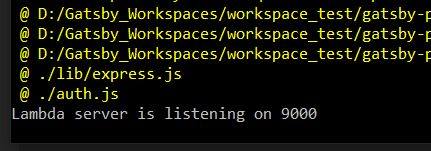
npm run install:lambda
npm run build:lambda
npm run start:lambda
If start is successful lambda should be listening to port 9000.
Calling our lambda function
index.js
import React from "react";

const pageStyles = {
  color: "#232129",
  padding: "96px",
  fontFamily: "-apple-system, Roboto, sans-serif, serif",
};
const headingStyles = {
  marginTop: 0,
  marginBottom: 64,
  maxWidth: 320,
};

class IndexPage extends React.Component {
  constructor(props) {
    super(props);
    this.onPop = this.onLogin.bind(this)
  }

  onLogin = (e, loginType) => {
    //lambda url
    var url = `http://localhost:9000/.netlify/functions/auth/${loginType}`;
    var win = typeof window !== `undefined` ? window : null;

    var n = win.open(url, "_self");
    if (n == null) {
      return true;
    }
    return false;
  };

  render() {
    return (
      <main style={pageStyles}>
        <title>Gatsby & PassportJS Tutorial</title>
        <h1 style={headingStyles}>Gatsby & PassportJS Tutorial</h1>
        <button
          type="button"
          target="_self"
          rel="noreferrer noopener"
          onClick={e => this.onLogin(e, "facebook")}
        >
          Login with Facebook!
        </button>
      </main>
    );
  }
}

export default IndexPage;
Create welcome.js to display the name if login is successful.
import React from "react"
const qs = require("query-string")

const Welcome = ({ location }) => {
  const parsed = qs.parse(location.search)

  return <div><h1>{`WELCOME!! ` + parsed.name}</h1></div>
}

export default Welcome
Run gatsby develop and test
Note: Make sure your facebook app is in development mode so the callback would work in localhost.
Using lambda in Netlify
Create netlify.toml in our project and add this code.
[build]
  publish = "public"
  command = "gatsby build && npm run build:lambda"
  functions = "lambda"

[build.environment]
  NODE_VERSION = "12.18.3"

[[plugins]]
  package = "netlify-plugin-gatsby-cache"
Modify our facebook.js and index.js
Remove localhost in url since we will deploy it live.
facebook.js snippets
Update callback url
      new Strategy(
        {
          clientID: "YOUR_FACEBOOK_APP_ID", //TODO: Change to your app ID
          clientSecret: "YOUR_FACEBOOK_CLIENT_SECRET", //TODO: Change to your client Secret
          callbackURL: `http://localhost:9000/.netlify/functions/auth/facebook/callback`
          callbackURL: `/.netlify/functions/auth/facebook/callback`
        },
        ...
Update redirect url
router.get(
  "/facebook/callback",
  passport.authenticate("facebook", { failureRedirect: "/" }),
  function callback(req, res) {
    return req.login(req.user, async function callbackLogin(loginErr) {
      if (loginErr) {
        throw loginErr
      }
     return res.redirect("http://localhost:8000/welcome/?name=" + req.user.displayName)
     return res.redirect("/welcome/?name=" + req.user.displayName)
    })
  }
)
index.js snippet
  onLogin = (e, loginType) => {
   var url = `http://localhost:9000/.netlify/functions/auth/${loginType}`;
   var url = `/.netlify/functions/auth/${loginType}`;
    var win = typeof window !== `undefined` ? window : null;

    var n = win.open(url, "_self");
    if (n == null) {
      return true;
    }
    return false;
  };
Update callback function in facebook developer
Add product and select facebook login
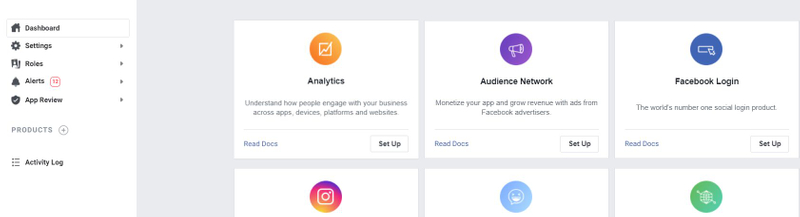
On facebook login settings add the callback with your host url and netlify function in “Valid OAuth Redirect URIs” under Client OAuth Settings.

Switch to live mode if you want other users to use your facebook login

Example Live URL: https://gatsby-passportjs.netlify.app
Github Link: https://github.com/garlen-javier/gatsby-passportjs
Tip: You can use Environment Variables for things like urls, api ids, etc. in Netlify and your Gatsby project so that it would be easier to test in both development and production mode.
Gatsby Environment Variables - https://www.gatsbyjs.com/docs/how-to/local-development/environment-variables
Netlify Enviroment Variables - https://docs.netlify.com/configure-builds/environment-variables
Conclusion
Once you’ve done this tutorial with passport facebook, it is pretty simple and almost similar to implement it in other passport login type. That’s the beauty of passportjs you can have almost the same strategy and it will still work but do note there are still some minor differences like what scope it can get from the user’s profile so I suggest that you still read the docs depending on what you use.